Nail Tutorial, Paint splattered nails!

30 June 2013


I wanted to try something new with my nails so i decided to do a bit of experimenting. I had seen people do this sort of splattered look so i thought i would try it for myself. I was quiet impressed with the finished look, i think its eye catching and different. Its pretty simple to do the only thing is it is quiet messy...


The kit
This is what i used to create the look.
Paper or something to put down as its very messy,
Straws x4 (forgot to put in pic),
Tape,
Scissors,
Topcoat-
I used Nails Inc Caviar topcoat,
Nail colours-
I used Barry M- Matt white, Guava, Greenberry and Rimmel- Blue me away and Sunshine.


Step one
To start with i painted my nails with two coats of my base colour, i chose white as i thought it would make the other colours really stand out. To save the amount of nail varnish you get all over you fingers its a good idea to stick tape around your nail beds, i personally found this the most time consuming and most fiddly bit but saves having to scrub it all off after.


Step two
I cut the straws in half  to make them easier to use. I took the straw and dipped one end into my first colour which was the darkest blue, aimed the straw over the nail and blew on the other end of the straw, it took a few goes to get used to it but the picture shows what the first layer looked like. 

  
Step Three
I took a clean straw so i didn't mix colours in the bottle, and dipped the end in my second colour a lighter blue, and blew over each nail.


Step Four
I took another clean straw and dipped it in my third colour a bluey green and blew that over each nail.


Step Five
I took another clean straw and dipped it in my fourth and last colour a bright yellow and blew that over over each nail. I then removed to tape and waited until my nails were almost completely dry to then add the topcoat to complete the look. I did have to clean a bit of nail varnish off my fingers but the tape defiantly saved a lot of mess.
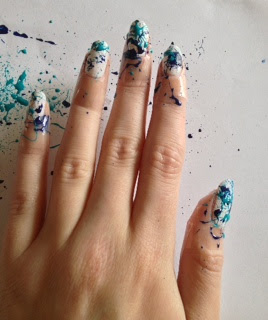

The finished look!
I was really pleased with how it looks and will defiantly try it again and see how it looks with different colours. 
I hope you like them! Has anyone else tried this technique? 

Zoe
X


My Current Beauty Wishlist!!

26 June 2013

This is a list of the current beauty products i am lusting after and am hoping to add to my collection...
 
1-Real Techniques Core collection brush set
I already have a couple of Real techniques brushes and am hopeing to add a few more to my collection, this set contains the pointed foundation brush, buffing brush, contour brush and detailer brush.

2-Vera Wang Pink Princess
How amazing is this perfume bottle!! Thats not the only reason i want it of course... i have smelt it and i also love the smell.

3-Urban Decay De Slick
I have been wanting to add a setting spray to my make up routine as i have oily skin, to make it last longer. I have heard good things about the Urban Decay ones and would love to try one out and see if they really do work.

4-Ren Glycolatic Radiance Renewal Mask
There is such a buzz around this product and im dying to try it out for myself to see if it lives up to the hype.

5-Real techniques Stippling Brush
Along with the brushes in the core collection kit i really want to try the stippling brush, i have seen it used in tutorials and it seems to give such a nice finish.

6-Nails Inc Bling it on Romance 
I have been lusting after this for a while now, it just looks so pretty i love the colours and the pretty bows.

7-St Tropez Self Tan Mouse 
I have been using the same fake tan now for about two years and i feel its about time i tried a new one, St Tropez has always put me off before because its quiet pricey and i would hate to splash out and then end up a streaky mess, but it is well reviewed and so i feel i may just have to take the plunge.

8-Stilla Kitten Highlighter
 Ive seen one of my favorite beauty you tubers shaanxo using this in her videos and i love how it looks and really want to try it myslf.

9-Nars Blusher 
I do not own any Nars products...yet! And i think one of there blushers would be a great place to start.

10-Nails Inc bling it on Denim and Studs 
As with the Nials Inc Romance set, ive had my eye on this for a while i love the idea of denim look nails and really want to try it.

So thats the products im lusting after, has anyone tried any of them? What did you think?

 Zoe
 X

OOTN, Disco pants!

25 June 2013


I went out saturday night for drinks with my best friend (the one behind these beautiful curls as i am useless with hair!) and this is what i wore...


As it was rainy and horrible i didn't feel like getting much skin out, but i thought what is more appropriate for a night of drinking and dancing that disco pants!!! The picture doesn't pick the colour up very well but there a dark slightly purplish grey colour and they are from River Island. 
The top is from Topshop and i love love love it!! This is definitely my favorite summer top it goes with everything and its just the prettiest colours, and i think a really interesting print with the mixture of black and white harlequin and the pretty pink and purple floral mixed in. 
The heels are black and metallic platforms also from Topshop, and the holographic necklace and silver bracelets are from Primark. 
What do you think of my disco outfit?

Zoe 
X

Nail Tutorial, Neon and Leopard Print!

22 June 2013


I love playing around with my nails and trying new things. I had a bit of time to spare today so i decided to do a leopard print design, and i thought id go for a bit of a summer vibe by using bright neon nail colours!


The Kit
For the base colours and spots i used a neon orange and pink nail art set from Topshop, and i used a black models own nail art pen to outline the spots and add detail.


Step one
I used the neon pink as the main base colour painting only the index finger nail with the neon orange colour, i applied two coats.


Step Two
To get the spots i just used the edge of the brush to dot random blobs of colour on the nail i used the pink on the orange base and orange on the pink base. They do not have to be neat and precise, different shapes and sizes will look more realistic. 


Step Three
Once the base and spots were completely dry, using the black nail art pen i outlined the spots in c shaped semi circles.


Step Four 
Again using the black nail art pen i then made random c shapes and dashes in the gaps to complete the leopard print.


The finished product!

When the outline was completely dry i applied one layer of topcoat, and all done! 
I really love this look its bold and eye catching and really is simple to do. 
I hope you like them? I would love to hear your comments, thanks for reading,

Zoe 
X

OOTN! Mint and Black

20 June 2013


I went out for a meal and drinks saturday night to celebrate a friends birthday, and this is what i wore.....


I basically worked the outfit around the skirt as i love it so much! I have a bit of an obsession with mint at the moment definitely my shade of the season. I bought the skirt about three weeks ago from H&M and it was £12.99, its a really good fit, and i really like skater skirts i think its a very flattering style. 
I chose to wear it with this black crop top which is from Topshop, i think the top slightly dresses the outfit up a bit with harness like straps. 
I thought a plain black shoe might look a bit boring so i chose these gorgeous leopard print heels, i had been waiting for an opportunity to wear these beauties, that i had picked up in a River Island sale for £20.00!!
I hope you liked my outfit? thanks for reading.
Zoe
X

Michael Todd Skincare, follow up review!

18 June 2013

Hello :)  I no i haven't kept up with blog posts lately, but i have had a busy time revising and sitting exams but anyway here is my promised skin care review.....
I did a post on my first impressions of the Michael Todd discovery skin care kit for acne/oily skin about a month back, this is just a quick follow up review with my thoughts on the products.

Charcoal Detox Cleanser
Jojoba Charcoal Scrub

Organic Lemon Toner

Moisture Lite
Kaolin Clay Mask

So i have been using the full skin care kit for a month now, i am glad i decided to go for a discovery kit as its been nice to try a completely new skin care regime using all new products.
I have been using the cleanser morning and night followed by the toner and moisturizer, and have used the face scrub about twice a week and the face mask once a week.
The main thing i have noticed since using the products is just a general improvement in the overall look of my skin, my skin looks a lot clearer and brighter! As for spots i have still had breakouts around my chin area mainly, but i have been left with a lot less discoloration and marking and i have noticed a lot less redness. The main thing that has impressed me, is since using the products i have definitely noticed a decrease in my skins oil production which is amazing as its one of my biggest skin problems and something i am always looking for in products for my face. 
My favorite products from the kit and the products i would repurchase has got to be the Moisture Lite Hydrating Lotion and the Jojoba Charcoal Facial scrub, the moisture lite really is just a lovely moisturizer, it smells amazing and its hydrating enough for my oily skin without leaving it greasy. The Charcoal scrub is really gentle and feels good on the skin leaving my skin well exfoliated without feeling like its damaging or drying out my skin by being too rough. 
Although i think i would only repurchase two products from the kit, i have enjoyed using the all the products, and it feels good knowing your using organic products on your skin. 
I have heard good things about the Michael Todd Blue Green Algae Toner and fancy trying that out as its meant to be good for blemishes.
I hope you have enjoyed reading my views on the Michael Todd products.
Has anyone else tried this Discovery kit? What did you think? Id love to hear your thoughts.
Thanks for reading,
Zoe 
X


Revlon Moon Candy review!

04 June 2013


Orbit and Moon Dust

Revlon nail art Moon Candy are dual ended nail enamels. One end is a colored nail enamel base and the other a 3D glitter topcoat. I bought two of the Moon Candies to try out, Moon Dust and Orbit.

Moon Candy in Moon Dust

Moon dust has a black base and a clear topcoat with iridescent glitter.
I applied the black base and was surprised at how well it covered, and found i only needed one coat.
I was really impressed with this as i have found other black enamels hard to apply evenly and have always needed a second coat. I then applied a coat of the glitter, this didn't cover as well as i had thought it would and i needed two coats to get an even layer of glitter over the entire nail. The flakes and thick and jagged and i found you have to be careful when applying not to smudge the bottom black coat.
Once applied the glitter looks a mixture of greens which i didn't expect but i do really like, the flakes all look a different colour in different light. I found this lasted about four days before starting to look messy at the tips of the nail but you could make it last longer by retouching, however i also found that layers of the glitter started to flake of pretty quickly i might put a layer go another clear topcoat on top next time to see if that stops it from happening.
Moon Candy in Orbit

Orbit has a purple base and a light purple topcoat with blue holographic looking glitter.
I was equally as impressed with the purple base as i was with the black it covered well and there was no need for a second coat. I thought that Orbit's glitter topcoat covered a lot better that the Moon Dust topcoat, i think the glitter flakes are thicker this did mean that it was quiet a jagged finnish and the flakes stick out a lot more so i gently pushed them flat to dry. I applied two coats to get an even coverage and the finished effect is a gorgeous mixture of deep blues. As with Moon Dust the layers of the glitter flaked off pretty quickly but it still looked good four days and it was just the tips again that had chipped.
Overall i really like the Revlon Moon Candy's the effect is just so interesting and different i just love the crystalized 3D look and i got a lot of compliments on my nails whilst wearing both colours.
Revlon Moon Candy are £7.99 in boots.
Has anyone else tried Revlon Moon candy? What did you think?
I would love to hear your views.

Zoe 
X


Related Posts Plugin for WordPress, Blogger...